Showing posts with label Home Cooking. Show all posts

Tuesday, January 15, 2013

Rare Roast Beef with Basil Oil


So it's the new year right?  And with that comes all of those pesky resolutions and vows to shed our bodies of those gingerbread cookies and pumpkin pies we were chowing down on throughout the end of 2012.  Everywhere we look there are adverts for diets, gyms slashing their fees, and people who just look hungry walking around.  This time of year is never fun- and something that I've never been able to jump fully on board with either.  However this year, I have been introduced to a diet that does seem to make sense.  Jason is a believer in the Paleo diet- one that was first introduced to me by fellow Boston bloggers Carrots N Cake, the Kitchen Misfit, and On Tap for Today. Now I know these ladies all to be Cross Fitting power houses, women who are putting health and fitness above it all, so I was already pretty on board with the basic principles of Paleo.  Now I'm still acquainting myself with it, but it's general strong points are to eat as though you were a part of the Paleolithic era- a caveman.  Let's boil that down - eat real foods- foods that have been around many many many years, foods that contain good, natural, nutritious things- and limit, or eliminate, sugars and things that are overtly starchy.  This doesn't sound so bad to me- proteins and veggies? That sounds like a pretty good style of eating.  Of course - I am awful at diets so I am not actually jumping fully into this Paleo thing- but I am trying my hand at cooking some Paleo meals.
 
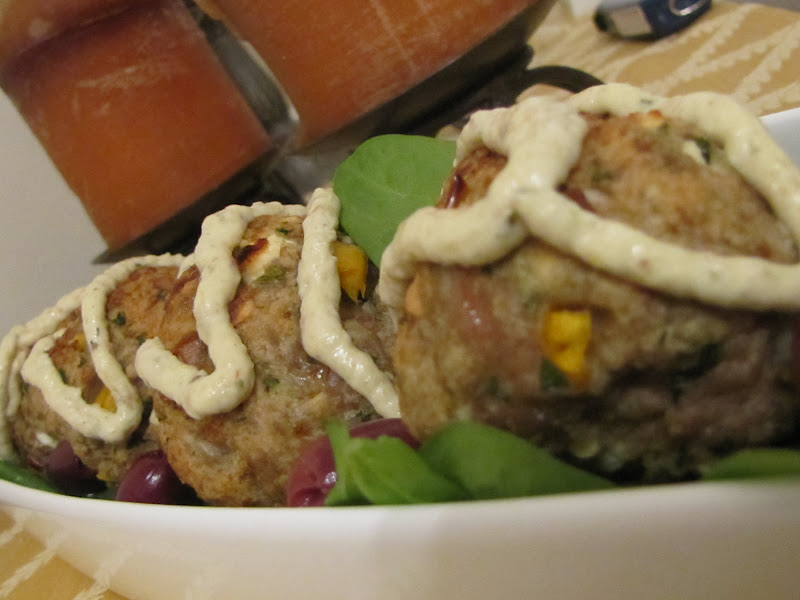
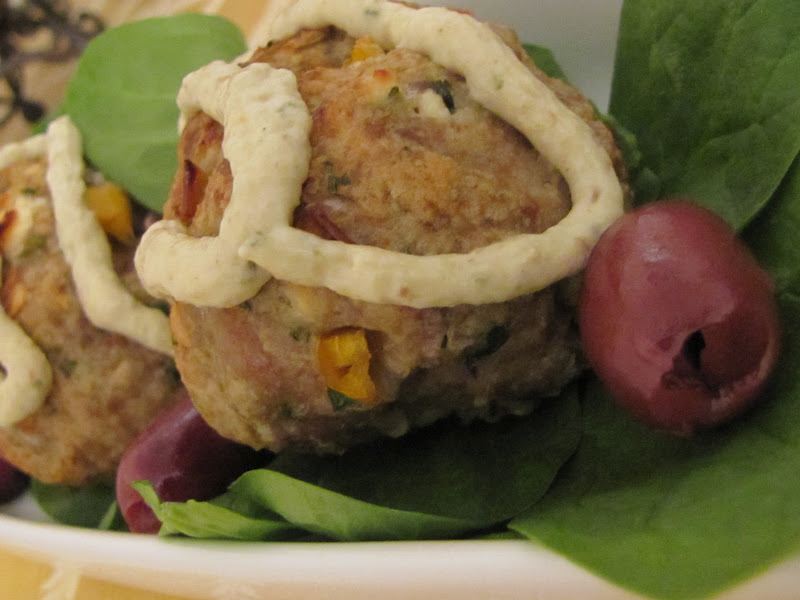
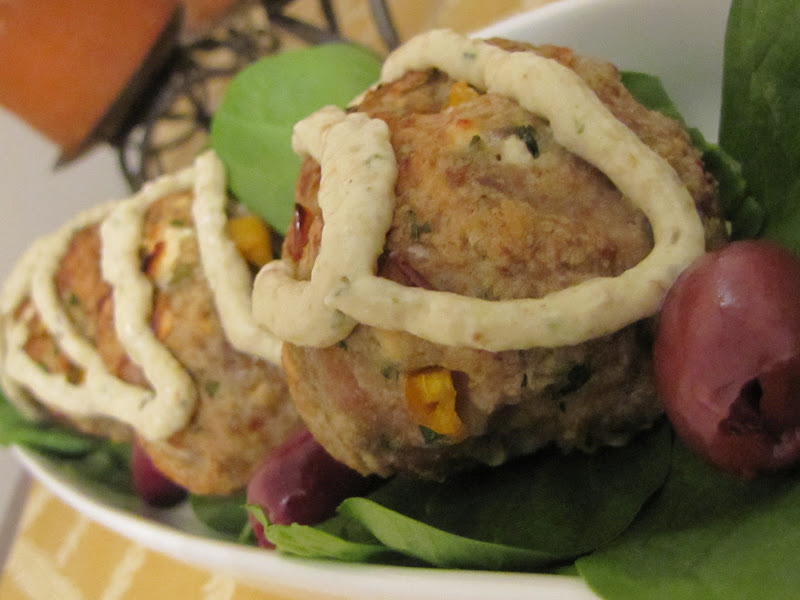
The first one I jumped on board with was an easy win.  I have been wanting to try my hand at making Roast Beef for ever.  Something about those thin slices of rare, well seasoned beef just screams delicious- as well as satisfying- to me.  As I haven't previously tried my hand at making Roast Beef, I searched my favorite guides for recipes, finally settling on one from Food and Wine.  I, of course, changed up my herbs of choice- using a mix of fresh Rosemary, Thyme and Parsley instead of their mix, though I did keep to the Basil Oil.  The result was perfectly rare roast beef, well seasoned and full of flavor.  I paired it with some mashed cauliflower and a kale salad bursting with bright vegetables and left the table full and happy.     

  • 1 1/2-pound beef eye of round roast
  • 1/2 cup mix of finely chopped rosemary, mint and tarragon
  • Salt and freshly ground black pepper
  • 1/2 cup plus 1 tablespoon extra-virgin olive oil
  • 2 cups fresh basil leaves
  1. Preheat the oven to 475°. Generously coat the roast with half of the chopped herb mixture and season with salt and pepper.
  2. In a large ovenproof skillet, heat 1 tablespoon olive oil over moderately high heat. Add the roast and lightly brown it on all sides, about 3 minutes. Wipe out the skillet, return the meat to it and roast in the oven until an instant-read thermometer inserted in the center registers 110°, about 25 minutes. Transfer the roast to a cutting board and season again with salt and pepper. Cover loosely with foil and let rest for 20 minutes.
  3. Meanwhile, bring a large saucepan of salted water to a boil and fill a bowl with ice water. Blanch the basil in the saucepan for 15 seconds. Transfer the basil to the ice water; drain well and squeeze out all of the excess water. Transfer the basil to a blender. Add the remaining 1/2 cup extra-virgin olive oil and a pinch of salt and blend thoroughly.
  4. Thinly slice the roast and drizzle each portion with 1/2 tablespoon basil oil. Sprinkle with the remaining 1/4 cup chopped herbs and serve.
Notes One serving 200 cal, 36 gm carb, 10.4 gm fat, 2.1 gm sat fat, 26 gm protein.

Monday, March 5, 2012

Greek Inspired Turkey Meatballs with Eggplant Yogurt Sauce


I have been on a turkey meatball kick lately.  They are just so versatile that you can combine any number of spices and herbs and come up with a different flavor profile every time.  Being that they are made from that ever so lean turkey, and I bake mine to ensure that no pesky oils or unwanted fats infiltrate them, they end up being a really healthy dinner option!

This week I had a craving for olives and Feta cheese.  I don't know where these things start, but I decided to go for it.  The Greek Inspired Turkey Meatball was born.

Of course a turkey meatball on its own isn't super fun, so I envision a rich and creamy sauce to go along with it.  I wanted something that would be full of flavor, compliment the meatballs, add some excitement but not kill the healthy style of the turkey.  The result?  Eggplant Yogurt sauce.

Meatballs
1 lb ground lean turkey meat
1/2 yellow bell pepper, diced
1/4 cup diced red onion
2 cloves garlic, chopped
Zest of one lemon
1 tsp chili pepper flakes
1 tbsp chopped oregano (dried is fine)
1/4 cup chopped fresh parsley
1 tbsp chopped fresh rosemary
1/2 cup fat free Feta Cheese crumbles
1/2 to 3/4 cup breadcrumbs
1 egg
Salt and pepper

In a large bowl combine the above ingredients until will mixed.  Get your hands in there and really work the ingredients together-the result should be visible-an even distribution of the ingredients, not too wet but not too dry either.

Shape the meat into balls- no more than 2 inches in diameter, place on a baking sheet and bake at 400 for about 30 minutes, or until completely cooked through.


Sauce
1 medium eggplant, pealed and chopped into 1 inch pieces
2 cloves garlic, chopped
1 tsp chili pepper flakes
1 tbsp ground cumin
1 tbsp oregano
Salt & pepper
1/2 cup olive oil
1 cup fat free Greek yogurt, plain
2 tbsp honey

Toss the eggplant with garlic, chili pepper, oregano, cumin, salt, pepper and half of the oil.  Spread in a single layer on a baking sheet and roast at 400 for 20 minutes or until the eggplant is soft and cooked through. When done remove from oven and cool.
Transfer the eggplant to a food processor add the yogurt and honey and turn on the processor to begin blending.  Slowly add in the rest of the oil.  The consistency should be thick, but still loose.

Serve the meatballs over a bed of fresh spinach and Kalamata olives and drizzle with the sauce.

Wednesday, January 18, 2012

Roasted Vegetable Hoagies on Homemade Focaccia

As I was setting out to investigate football foods, I thought: can you really sit down to enjoy a big game without a sandwich?  Sure chips and dip, soups, chili's, and stews are all great- but isn't there some thing about clinging on to a sandwich with both hands as your team defends it's position and tension is high, and then tearing off a bite with your teeth- a feeling just as animalistic as a great tackle on the field- right? 

I might be stretching, just a tad with that one, but the sandwiches I settled on for our football viewing party were worth a lot more! I decided to get them started on my favorite "guilty pleasure" sandwich bread- Focaccia.  I am a ridiculous freak for Focaccia- it's crisp exterior blending into a pillowy soft yet thin interior has just the texture contrast I love.  Baked with olive oil, earthy rosemary, spicy pepper and a sprinkling of salt the flavor profile separates this from just a typical bread to something truly special.

I decided several things about these sandwiches- first, I would make the bread from scratch.  It's time that I become more comfortable with breads, and since my love of Focaccia is so great, I should be able to make a good one.  Second- I wanted to make them vegetarian.  Football food, and perhaps rightly so, is often very meat heavy, and it relegates our vegetarian friends to chips and dip while the rest of the party noshes on meatballs, sliders and Italian hoagies.  Silliness.  These sandwiches were just as warm and comforting as a big meatball sub, jam packed with flavor, and veggie friendly!

I found a recipe on King Arthur (of course) that I knew would be both easy (because I remain a baking wimp), and delicious.  I set to work on the bread, and let me tell you- the recipe was pretty fool proof.  It all got slapped together in no time, while I concentrated on other tasks.  


Focaccia Bread (adapted from King Arthur Flour)


1 1/2 teaspoons active dry yeast
1/2 teaspoon granulated sugar
1 cup warm water
1/2 teaspoon salt
1/2 cup King Arthur Traditional Whole Wheat Flour
2 1/2 cups (approximately) King Arthur Unbleached All-Purpose Flour
2 tablespoons extra virgin olive oil
1 tablespoon chopped rosemary
2 teaspoons each- black pepper, salt
Dissolve the yeast and sugar in the water. Add 1/4 cup of the all-purpose flour. Stir with a whisk and let this sit for 10 minutes to give the yeast a chance to get going.
Add the salt and the whole wheat flour. Add the rest of the all-purpose flour, 1/2 cup at a time, until the dough is pulling away from the sides of the bowl. Turn the dough out onto a lightly floured counter and knead it, adding more flour as necessary, until the dough has formed a smooth ball. Place the dough in an oiled bowl and turn the dough to coat it with the oil. Cover the bowl with plastic wrap or a damp towel. Let the dough rise in a draft-free place for 1 1/2 to 2 hours.

When the dough has doubled in bulk, punch it down, and turn it out onto a lightly floured counter. Stretch the dough into a 14-inch circle and place on a greased baking sheet. Let it rise for 30 minutes.

Preheat the oven to 425°F while the focaccia is rising. Dimple it with your fingers and place it in the oven. Evenly spread the dough with olive oil, rosemary, salt and pepper.  Bake for approximately 25 minutes, or until lightly browned and cooked through. 
After the bread had cooled, I cut it into squares  (approximately 4" x 4") and then stuffed them with roasted Portobello mushrooms, roasted red and orange bell peppers and a slice of Provolone cheese.  I baked them off for 10 minutes or so, until the cheese had fully melted, and then devoured.  
These sandwiches were simple, but truly delicious.  The simplicity of the roasted vegetables paired with the gooey cheese and then stuffed into the flavorful homemade bread was a combination worth its salt.  They were hearty and satisfying, providing all of the toothsome feel you want when savagely ripping into them...or daintily eating them as a lady would. 
Go Pats! 


Tuesday, January 17, 2012

Mashed Potato Soup

It really shouldn't come as any big surprise that I adore, adore, my friends who are just as obsessed with food as I am.  Trading ideas, listening to their thoughts, and the obscene amount of knowledge that I gain from these conversations constantly amazes me. I am inspired by their ideas, and treasure these discussions.  Last week, in passing, my friend Dan (aka Chef Daniel Silver raved about here) mentioned that he was competing in a soup contest, and he was entering with a mashed potato soup that sounded incredible.  I was in the process of designing some snacks for football viewing, and immediately thought that that sounded like a wonderful accompaniment.  Hearty and comforting, with the approach ability of the heart warming side dish we all love so well, but spun into a perfect soup, perfect for entertaining and keeping guests warm and satisfied as they cheer on their favorite team.  


I alerted Dan that I'd be pilfering his idea, though I promised to change it up.  His included that little bit of heaven ingredient- roasted garlic, a combination I knew had to be delicious.  I took a bit of a left turn though and decided to draw some inspiration from the idea of Potato Skins, a classic sports accompaniment in my mind, and topped my bowl of steaming hot soup with cheddar cheese, scallions and bacon (mmmm bacon).  I always believe it is ridiculous to talk about "lightening" something up when I've just discussed bacon, but I did want to make the note that I decided against using cream in this soup to achieve the "creamy" flavor of mashed potatoes.  Instead, I depended on my old friend the Cannelloni Bean,which, when whipped into submission, provides a wonderful cream like flavor/texture that I truly adore.


Mashed Potato/Potato Skin Soup


8-9 medium Red Bliss Potatoes, peeled and cut into bite size pieces
4 large garlic cloves, peeled, but left whole.
1 can drained cannelloni beans
3-4 cups vegetable stock
2 tablespoons butter
Salt and Pepper


Shredded Cheddar cheese,
Crisp crumbled Bacon
Scallions


Place the potatoes and the garlic cloves in a large pot, and fill with cold water until the potatoes are submerged.  Set over medium heat and boil until the potatoes easily break a part with a fork.  Drain the water from the pot, and then add the beans,butter and 2 cups of the stock.  Puree using either an immersion blender (my choice), or in a blender/vitamix or even a food processor (last choice).  Salt and pepper to taste.  Continue to add the stock until the soup reaches the consistency you desire.  The soup should be creamy and thick.  


Ladle into bowls and top with cheese, bacon and scallions ( or whatever toppings your heart desires) grab a spoon, a beer, and start cheering on your favorite team!


Friday, January 13, 2012

Banana Chocolate Chip Bundt Cake

I won't lie to you- bringing baked goods into my office is a secret joy of mine.  I  don't do it often- don't want to spoil my co workers, but when I do- it's just always so much fun.  I tend to do it in secret- I unwrap the goodies in the kitchen before many people are here, and then nonchalantly walk away hoping not to be spied by anyone.  Then, as people arrive I get to hear the exclamations as people stroll to the kitchen for their morning coffee or water and discover the offering.  Throughout the morning I then have morbid curiosity to find out how quickly it is devoured. What can I say- it's a little ego boost.  


Last night, I stood in my apartment, cleaning out my fridge of leftovers for the week for dinner, I noticed two sad looking bananas in my fruit bowl.  Purchased, I'm sure with the idea of eating them over last weekend, forgotten about, and then pushed aside when I went grocery shopping the week in favor of newer, tastier bananas.  They looked so forlorn there, pretty yellow siblings lying next to them, and my apple pear mocking them, I decided that I had to rescue them.  I quickly found a recipe for Chocolate Chip Banana Bundt Cake and those that were forlorn were re-purposed.  Life again.  I knew that I would want that cake out of my house pronto- so as soon as possible I wrapped up the cake, and put it with the rest of my stuff for the day.  Two birds- one stone.


Banana Chocolate Chip Bundt Cake (stolen from Tastebook.com


  • 2 cups chocolate chips
  • 3 cups all-purpose flour
  • 1 tbsp. baking powder
  • 1/2 tsp. salt
  • 1 cup mashed ripe bananas (about 2 large bananas)
  • 1/4 cup whole milk, at room temperature
  • 1 tbsp. vanilla extract
  • 1 cup butter, softened
  • 1 1/2 cups sugar
  • 4 large eggs

DIRECTIONS

Preheat the oven to 325 degrees. Butter a 10-inch bundt cake pan and dust with flour. Toss the chocolate chips with 2 tablespoons of the flour and set aside. In a medium bowl, stir together the remaining flour, baking powder and salt. In another bowl, stir together the bananas, milk and vanilla. In a large bowl, using a handheld electric mixer, beat together the butter and sugar until combined. One at a time, beat in the eggs, mixing well after each addition. In three additions each, mix in the flour and banana mixtures until just combined. Using a wooden spoon, stir in the chocolate chip mixture. Scrape the batter into the prepared pan and spread evenly. Bake for 65 to 75 minutes or until a toothpick inserted into the center comes out clean. Transfer the pan to a wire rack. Cool 10 minutes. Carefully invert the cake onto the rack to remove it from the pan and cool completely. For a garnish, sift confectioners’ sugar over the top of the cake or drizzle with melted chocolate chips. Store the cake in an airtight container at room temperature. 


The cake was moist and dense, full of sweet banana flavor, interrupted only by the delight of bitter sweet chocolate.  This was a sturdy cake, able to stand up to a good topping, had I dedicated time to make one, or a delightful glaze.  I kept envisioning a orange glaze for some reason...perhaps I'll have to make again. 


This is a good cake recipe though folks-and I'll say the reviews from my co workers- who quickly figured out who the "stealth" giver was- were great. 

Tuesday, December 27, 2011

California Olive Ranch Olive Oil Chocolate Chip Cookies


Several months ago I had a wonderful time experiencing the deep, rich flavors of olive oil from the California Olive Ranch at a dinner here in Boston.  During the evening the reps from COR spent time talking about the versatility of Olive Oil, a topic I hadn't thought much of.  Normally I just saute with it, or whisk it into dressings, however they spoke of it's ability to take the place of butter in baking and that really piqued my interest.
 
Of course, butter is delicious.  It is a perfect pairing with golden brown toast, delicious melted over a piping hot mound of mashed potatoes, and a wonderful flavor in cookies and cakes.  However, butter also equals, well, less than nutritious elements and on the flip side, olive oil has so many wonderful properties I wondered how the substitution would be.  

I decided to check it out with America's classic cookie- the Chocolate Chip.  As American as apple pie, the chocolate chip cookie is flavored by those delicate elements of vanilla, brown sugar, salt, chocolate and, of course, butter.  So how would these cookies stand up without this crucial element?

Olive Oil Chocolate Chip Cookies

by Ashley Viegas | May 31, 2011
  • 2 ¼ cup all-purpose flour
  • 1 ½ tsp. salt
  • 1 tsp. baking soda
  • ¼ cup California Olive Ranch extra virgin olive oil
  • 1 tsp. vanilla extract
  • ¾ cup granulated sugar
  • ¾ cup brown sugar
  • 2 eggs
  • 1 or 2 Tbsp. of milk (or rice milk)
  • 1 cup chocolate chips
Preheat the oven to 375 degrees F.
Combine the flour, baking soda, and salt in a medium bowl and set aside.
Combine sugars, vanilla, and olive oil. Beat in the eggs one a time. Gradually beat in the flour mixture, then add in 1 Tbsp. of milk to make the dough a bit firmer, maybe another tablespoon if you feel the dough is too sticky/dry (I use about 1 tablespoon + 1 teaspoon).
Roll the dough into balls with your hands and place on a greased and/or lined baking sheet.
Bake for 10-12 minutes, until lightly golden and set. (Mine took about 10 and a half minutes.) These over bake quickly, so it’s better to take them out a bit early if you’re unsure. Allow to cool for a bit on the baking sheet, then move to another surface to finish cooling.
Recipe courtesy of Sydney Kania

Now I subbed in California Olive Ranch's Arbequina Extra Virgin Olive Oil in place of the regular Extra Virgin mainly because I didn't read labels.   The Arbequina has a stronger, fruitier flavor to it, so its presence was a bit more recognizable.  However, even with that error, these cookies were fantastic.  They maintained their tastes of vanilla and salt, the chocolate chips were warm and melty, and the cookies bore very very little difference to their higher caloric brother.  I think I have been converted- olive oil in baking- there's a way to start the new year on a healthier note!

Wednesday, November 9, 2011

Maple Cornbread

Last weekend, as I geared up to watch my beloved Patriots, I got a hankering (yes a hankering- I said it) for some chili.  So I whipped up a batch, but as I was considering my big pot of spicy goodness as it simmered on the stove, I realized another craving- good, crumbly corn bread.  Now, under normal circumstances, I am not a cornbread fan. Often I find it to have an odd bitter after taste, or it's too greasy, or it just has an awkward mouth feel.  However, when done correctly- cornbread is simple and delicious.  The corn meal makes for a crumbly texture, the flavor steeped in corn and butter, and the overall affect light and fluffy.  It's real beauty is in its versatility- it can stand up to the hearty spice of a good chili, or be simply adorned with just a pat of butter and allow it's simplicity to shine. 

Knowing how wonderful cornbread could be when made correctly, I set out for a recipe that wouldn't disappoint.  I turned, of course, to my King Arthur Flour cookbook- I swear-that book is a godsend!  I found a recipe for Maple Cornbread within its folds and immediately decided it would be worth a try.  

Maple Cornbread, from King Arthur Flour

1 cup (4 1/4 ounces) King Arthur Unbleached All-Purpose Flour

1 cup (4 3/4 ounces) yellow cornmeal
1 tablespoon (3/8 ounce) baking powder
1/2 teaspoon salt
1 cup (8 ounces) milk, whole, skim or 2%, your choice
1/4 cup (2 1/2 ounces) maple syrup
1/4 cup (2 ounces) melted butter
2 large eggs


Preheat your oven to 425°F. Lightly grease or oil an 8 x 8-inch square or 9-inch round baking pan.


In a medium-sized mixing bowl, whisk together the flour, cornmeal, baking powder and salt until thoroughly combined. In a small bowl, or in a large measuring cup, whisk together the milk, maple syrup, melted butter and eggs. Add the liquid mixture to the dry ingredients and stir just until moistened.


Pour the batter into the prepared pan, and bake the cornbread for about 20 to 25 minutes, until it's lightly browned and a cake tester inserted into the center comes out clean. Remove it from the oven, and serve it warm with butter and additional maple syrup, or with a main dish -- red beans and rice are nice! 

I really enjoyed this cornbread.  The maple flavor was very light, but it did cure the dreaded bitter flavor.  I paired this with a very spicy chili and loved its texture and homey goodness next to the big flavors, and I also topped it with a piece of griddled ham and an over easy egg for a wonderful breakfast for dinner meal.  I think this might just become my go to corn bread!

Monday, October 31, 2011

Not Your Average Cranberry Sauce

There is something wonderful about tradition.  The repeated action, the comfort in its history...the idea of traditions just makes me smile. I have been in charge of cranberry sauce for Thanksgiving Dinner for as long as I can remember.  It began with my mother giving me the berries to sort- and I would sit at the kitchen table and carefully look through the bags, finding any cranberries with imperfections, and removing any leftover stems or leaves that managed to cling on from the bog.  As time went on and I grew up, I got to be in charge of the whole process- sorting to cooking.  Of course, Cranberry Sauce might be one of the easiest things to make, so I can't feel too proud of it.  Water, sugar, berries- it's pretty straightforward. 

This weekend, as I grocery shopped for the week ahead, I saw a lovely bag of cranberries sitting in the refrigerator case.  I never make cranberry sauce outside of Thanksgiving, but seeing them inspired me and into my cart they went.  I continued to wander and found some of my other favorite fall ingredients- sage, a pomegranate, and then, ginger root.  I grabbed at each excitedly, normal ingredients becoming treasures.

Back at home I measured out a cup of sugar and a cup of water and set them, in a medium sized pot, over medium low heat.  The idea here was to get the sugar to melt.  Then I roughly chopped four leaves of fresh, beautiful sage, and then grated a tablespoon of fresh ginger, and a table spoon of orange zest into the pot.  These ingredients simmered together until all of the sugar melted into the water, and then I removed the sage leaves, and then added the package of (sorted) cranberries.  I followed the "directions" on the package from here- though basically you just wait until the cranberries burst and then the sauce is done.

I poured the sauce into a bowl and set aside to cool.  Once it had reached room temperature, I removed about a cup of the sauce, and stirred in 1/4 cup of pomegranate seeds, an 1/8 cup chopped walnuts, and then just a bit (a teaspoon) of fresh cracked black pepper.  I was in love with this sauce.  The cranberries had a wonderful spicy flavor from the fresh ginger and the black pepper, they had maintained their own tartness, but were wonderfully sweet from the sugar, as well as the pomegranate seeds.  The walnuts helped a long with texture and the orange added a wonderful citrus freshness.  This was great on it's own, and as a relish for a sandwich- more on that later though.    

Friday, September 9, 2011

A Summer Classic- Gazpacho

It's funny- all winter I dream about summer vegetables- and those dreams always include beautiful tomatoes and corn on the cob.  What I tend to forget is that tomatoes and corn don't really peak in their season until August.  The past couple of weeks though, beautiful tomatoes and perfect corn has been available throughout Farmers Markets- and I have been scooping them up!  When faced with what to make for a picnic I was attending over the Labor Day weekend, I looked to my fruit bowl and saw gorgeous, ripe tomatoes.  I checked the rest of my kitchen and sure enough- fresh ears of corn sat waiting to be shucked.  Gazpacho would be made.

I love Gazpacho in general, because it's delicious, but I love it even more for a picnic.  Gazpacho is a classic Spanish soup- created by combining tomatoes, stale bread and other seasonal vegetables, into a chilled, raw soup.  When allowed to sit for a bit, the flavors of the vegetables and spices mingle together, and the result is a super flavorful, hearty soup.

2 fresh tomatoes, medium to large size, cut into chunks
2 slices stale white bread, cut into chunks
1/3 cup onion (red or yellow) diced
1 cup + fresh parsley
1 jalapeno, cut into circles
Kernels only 1 ear of cooked corn
1/2 cup diced cucumber
1/4 cup crumbled feta
Olive Oil
salt
pepper

In a food processor (blender would also work) combine the tomatoes, bread, onion, parsley and jalapeno.  Drizzle the olive oil into the top until the soup reaches the correct consistency- for me- this is a thick soup so maybe 1/4 of a cup to a 1/3 of a cup.  Add salt and pepper to taste. 

Transfer the soup from the blending/processing apparatus into a bowl. Add the corn, cucumber and feta. 

Let the soup chill in the refrigerator for 2 hours- over night.  Serve with additional feta and chopped parsley garnish. 
   

Thursday, September 8, 2011

Pate a Choux with Creme Patissiere (Cream Puffs)

Every once in a while I realize how strange I really am.  I took some time off last week, and what did I decide to do with it?  Go to the beach?  Visit friends?  Take a trip to a land unexplored?  Nope- I knew I'd be happiest in my kitchen so I arranged a "stay cation" for myself to try out some ideas I had (see Caramel Apple Cupcakes) and to challenge myself to make some things I haven't made before.  One of those items- was classic Cream Puffs.

Now I have to be honest here- Cream Puffs were not my first thought.  My mom had thought that peach pie might be delicious with all the beautiful local peaches that are around- I agreed, but having had success already with pie crust recently, I decided instead to make turnovers with puff pastry.  Then I read that puff pastry required a fair amount of counter space....sadly counter space is not something I have to spare in my apartment so I kept looking through recipes.  And then I stumbled upon King Arthur Flour's recipe for cream puffs and I was sold. 

I love cream puffs- I love the subtle yet buttery flavor of the dough, I love how light and airy they are, I love that they are stuffed with cream filling.  Most of all, I love that they feel like little clouds when you bite into them.  A slight crisp on the outside gives way easily, like a bubble being popped, to the sweet whipped cream like filling.  They are just delicious pieces of heaven.  I have always assumed that they are difficult to make- that to achieve the proper puff, the eggy nature of the interior....I thought all of that spelled out hard to make.   However, what I found was quite the opposite- they were easy as pie to make- from the fluffy little shells to the Creme Patisserie I used from the expert on all things French- Julia Child.

Pate a Choux (recipe from King Arthur Flour)

1 cup water

1/2 cup (1 stick) butter, cut into pats
1/4 to 1/2 teaspoon salt; use 1/2 teaspoon if you're using unsalted butter
1 1/4 cups King Arthur Unbleached All-Purpose Flour
4 large eggs, at room temperature

1) Preheat the oven to 400°F. Lightly grease (or line with parchment) two baking sheets.


2) Combine the water, butter, and salt in a medium-sized saucepan, heat until the butter has melted, and bring to a rolling boil.


3) Add the flour all at once, stirring vigorously until the mixture smoothes out and follows the spoon around the pan; this should take less than 30 seconds.


4) Remove the pan from the heat, and let the mixture cool for 5 to 10 minutes. It'll still feel hot, but you should be able to hold a finger in it for a few seconds.


5) Transfer the dough to a mixer. Beat in the eggs one at a time; the mixture will look curdled at first, but when you add the last egg it should become smooth. Beat for 1 minute after adding the last egg. You'll have a stiff, smooth batter.


6) Drop the dough by teaspoonfuls onto the prepared sheets (a teaspoon cookie scoop works well here). Leave about 1 ½" to 2" between them; they're going to expand to about the size of a golf ball.


7) Bake for about 20 minutes, till they've puffed, they're a medium golden-brown, and they look dry.


8) Remove baked puffs from the oven, and use a sharp knife to cut a slit into the side of each puff, for steam to escape; this will help prevent them from becoming soggy. Return the puffs to the oven for 5 minutes, then remove from the oven, and transfer to a rack to cool. While the puffs are cooling, prepare the filling.****

****(I used the recipe from my King Arthur Flour Cook Book- the measurements were all the same- however they stated, at the end, instead to turn off the oven once they were done cooking, and crack the door open for a 1/2 hour.  I'm not sure what the difference would be-but that method worked for me!) 
Creme Patisserie (recipe from Julia Child's Mastering the Art of French Cooking)

1 cup granulated sugar


5 egg yolks


1/2 cup flour


2 cups boiling milk


1 tbsp. butter


1 1/2 tbsp. vanilla extract


Directions:


Gradually beat the sugar into the egg yolks and continue beating for 2 to 3 minutes until the mixture is pale yellow and forms "the ribbon".


Beat in the flour.


Beating the yolk mixture, gradually pour on the boiling milk in a thin stream of droplets.


Pour into saucepan and set over moderately high heat. Stir with a wire whip, reaching all over bottom of the pan. As sauce comes to a boil it will get lumpy, but will smooth out as you beat it. When boil is reached, beat over moderately low heat for 2 to 3 minutes to cook the flour. Be careful custard does not scorch in bottom of pan.


Remove from heat and beat in the butter, then vanilla extract. If the custard is not used immediately, clean it off the sides of the pan, and dot top of custard with softened butter to prevent a skin from forming over the surface. Creme Patisserie will keep for a week under refrigeration, or may be frozen.


I slightly amended the Creme Patisserie recipe by skinning and pureeing a single peach and then combining about a cup of the Creme Patisserie with 1/2 cup of the peach puree.  This gave the Creme Patisserie a more liquid texture but a beautiful peach flavor.

These were rather addictive to be honest.  Each one puffed up and made beautiful towers of pastry, but when sliced into were pleasantly cavernous allowing for maximum amounts of Creme Patisserie to be piped in.  I topped each with fresh raspberries and enjoyed every heavenly bite!  


Tuesday, September 6, 2011

Caramel Apple Pound Cake Cup Cakes

Whether we like it or not- Fall is quickly approaching.  The time for sweaters, woolen scarves and warming cups of tea is right around the corner.  I say, while it's sad to say goodbye to the wonderful sunny days of Summer, why fight it?  Recently a friend reminded me of the beauty of those wonderful Fall treats, Caramel Apples.  Crisp apples encased in luxurious caramel, warm and melty, chilled only by the brisk air-they are the perfect treat.  

Inspired by this idea this weekend, I turned to my kitchen and looked to see how I could re create this treat, but in typical fashion, put a little twist on it.  I played with the idea of a cupcake for several days, considering a variety of combinations and toppings.  However finally, I settled on the rich sturdiness of Pound Cake, over which I would spoon Caramel Apple sauce.  I loved the dense nature of the Pound Cake which I enhanced with the warming spices of Mace and Nutmeg.  The resulting flavor was a light hint of fall flavors, enhanced with the homemade caramel sauce.   I edited both of the recipes below- I've put my additions in italics under them.

Vanilla Pound Cake (recipe adapted from King Arthur Flour)
1 cup butter
1 cup sugar
3 tbsp packed light brown sugar
1/2 tsp salt
1 tbsp vanilla extract
1 tsp baking powder
1 3/4 cup unbleached all purpose flour or cake flour
4 large eggs
1 tsp mace
1/2 tsp nutmeg

In a large mixing bowl, beat together the butter, sugars, salt, vanilla, and baking powder until smooth and fluffy.  Add the flour and mix well; the batter will be almost like paste.  Beat in the eggs, one at a time, beating well and scraping the bottom and sides of the bowl after each addition; the batter will be quite fluffy.  

Spoon the batter into a lightly greased 9-10 inch tube pan, 9-10 cup bundt pan, or 9 x 5 inch loaf pan.  Bake the cake for about 45 minutes, or until a cake tester or tooth pick inserted into the center comes out clean.  Remove the cake from the oven and let it cool in the pan for 10 minutes.

I spooned the batter into a cupcake pan, and then watched the cupcakes starting at a 1/2 hour.  They came out of the oven around 33-34 minutes.

Deep, Dark Salted Butter Caramel Sauce [Sauce au Caramel au Beurre Salé] Recipe from the Smitten Kitchen


Makes about 1 1/3 cups


3 ounces (6 tablespoons) salted butter, the better you can get, the better it will taste---I used unsalted butter and then added 1/2 tsp - 1 tsp of salt
1/2 cup plus two tablespoons heavy cream, at room temperature

Melt the sugar over medium to moderately high heat in a larger pot than you think you’ll need-at least two or three quarts, whisking or stirring the sugar as it melts to ensure it heats evenly. Cook the liquefied sugar to a nice, dark copper color. Add the butter all at once and stir it in, before turning off the stove and pour in the heavy cream (The sauce will foam up quite a bit when you add it; this is why you want the larger pot.), whisking it until you get a smooth sauce.

You use it right away or pour it into a jar and store it in the fridge for up to two weeks. When you take it out, it will likely have thickened a bit but 60 seconds in the microwave brings it right back to pouring consistency.

Caramel Apple Sauce
2 small semi tart apples, cored and chopped.
1 tbsp butter
1 tsp cinnamon
1 tsp nutmeg
1/2 tsp salt
1/3 cup chopped walnuts (optional)
1/2 - 3/4 cup caramel sauce (recipe above)

In a saute pan over low heat melt the butter and add the cinnamon, nutmeg and salt.  Add the apples, and stir until they are coated with the spice mixture and just slightly tender.  Add the walnut and the caramel sauce and stir until combined. 

Spoon the caramel apple sauce over the cupcakes and serve. 

Wednesday, August 17, 2011

Walnut, Strawberry and Nectarine Bread

Every year I fill out these wellness tests for my health insurance, and every year I receive the same feedback- eat more fruit!  Somehow this always proves challenging to me-but this year I decided to take it to heart and have been packing myself a fruit salad to eat when I get to work in the morning.  Berries, melon, pineapple, nectarines- whatever looks fresh and tasty I purchase and then cut up and dole out portions of each morning.  Honestly- chowing down on my fruit salad while I sort through the over night emails at my desk is one of the highlights of my morning now.  However, invariably, at the end of the week I have some leftover fruit- and I am left with ways to use it up. 

This past sunday, I opened my fridge to find something for breakfast and I found an almost empty carton of strawberries staring back at me.  They were bruised, a little soft for my palatte, and itching to be incorporated into something that did not require them to be at their peak.  So decision made- I would be making something with strawberries- but what?  Not enough of them for Strawberry Ice Cream, they weren't nice enough for Strawberry Shortcake.  I pulled out my trusty King Arthur Flour cook book and started scouring it for strawberry recipes. And then I found it- Walnut Strawberry Bread in their quick breads section.  I read the recipe, and realized that I had every ingredient I needed-score!

Off to the kitchen I went, and just about an hour later I had piping hot loaf of Walnut Strawberry Bread.  Well...kinda.

Once I mashed the strawberries I realised that I just didn't have enough of them.  The recipe mentioned combining the strawberries with rhubarb, but I definitely didn't have any rhubarb.  However, what I did have was some almost over ripe nectarines.  They would do.  I peeled and mashed two of those- and hit my measurement for mashed fruit.  I also realized (very late in the process) that I was out of vegetable oil- I subbed in the same amount of melted butter- successful substitution- game on!

Walnut-Strawberry and Nectarine Quick Bread (adapted from King Arthur Flour)

1/2 cup (2 ounces) chopped walnuts

1 1/2 cups (6 1/4 ounces) unbleached all-purpose flour
1 cup (7 ounces) sugar
1/2 teaspoon baking soda
1/4 teaspoon salt
1/4 teaspoon nutmeg
1 tablespoon lemon zest OR 1/4 teaspoon lemon oil
2 eggs
1 cup (10 ounces) mashed strawberries*
1/2 cup peeled and mashed nectarines
1/2 cup (3 7/8 ounces) vegetable oil

Preheat your oven to 350°F. Grease and flour (or spray with non-stick vegetable oil spray) a 9 x 5-inch loaf pan.


In a medium-sized mixing bowl, whisk together the walnuts, flour, sugar, soda, salt and nutmeg. In a separate bowl, whisk together the lemon, eggs, strawberries and vegetable oil. Combine the wet ingredients with the dry ingredients, whisking until well-blended.


Pour the batter into the prepared pan, and bake for 55 to 60 minutes, until a cake tester inserted into the center comes out clean. Cool the bread in the pan for 15 minutes, then remove it from the pan and transfer it to a rack to cool completely, 1 hour or longer. For best flavor and easiest slicing, wrap the bread while still slightly warm and let it sit overnight.

This was the easiest, most delicious bread!  The fruit was sweet and flavorful throughout, and the lemon zest really made the flavors pop with every bite.  Nutmeg can often over power, but here it just created a real dept of flavor and made this bread seem much more complex than it really was.  I will definitely be making this bread again- and I might start trying new fruits in it as well! 

Tuesday, August 16, 2011

Beer Corn Soup-the way it should be!

Oh corn -what has happened to you?  I read so many menus, all celebrating your season with delightful renditions of corn soup-but so many, so very many, are pairing you with wine.  I myself made corn soup that I dressed up with Marscapone cheese just for the fun of it.  I look back now and wonder why?  Why are we all pushing corn into the "refined" world of wine and Marscapone?  Corn is food to be eaten outside, at a barbecue, with your hands.  It is made for melting butter on top of and accenting with pepper and salt and ripping its sweet flesh off the cob with your teeth.  It isn't a refined food.  Corn is delicious, it is versatile, but refined it is not. 

I was craving some corn soup, and, as I considered how I would make it, this revelation occurred to me, and I decided to bring corn soup back home again.  Beer.  What could be more BBQ than beer?  This hoppy, bitter liquid just calls out for campfires, hot dogs and friends. 

Of course, the real question was, what beer to use.  I stood in staring at the selection and finally decided on what was touted as Beer of the Year, Dogfish Head's Raison D'Etra.  It was described as a "deep mahogany ale, brewed with Belgian beer sugars, green raisins and a sense of purpose".  Sounded to me like it would complement corn well. 

Back in my kitchen I began the soup by cutting the kernels off of two ears of corn, and then cutting down the cobs into pieces that would fit in a small sauce pan, covered them with water and set them a-boiling.  In a large skillet pan I melted a tablespoon of butter over low heat and then added 4 thinly sliced garlic cloves, and a tablespoon of chopped fresh parsley, salt and pepper.  When the garlic had softened, I added the corn kernels, and a teaspoon more of butter.  At this stage, I wanted to keep a fair amount of liquid in the pan and over a low enough heat where the corn kernels would cook, but not fry or crisp.  Once the butter had melted, I added 2 tablespoons or so of the beer, and raised the heat to a low medium.  I covered it, and let it saute.  A few minutes later, I gave the corn a good stir, and added more beer, and then covered again.  I repeated this until about half the beer had been used, and then kept it covered and over the heat until the alcohol had burned off.

I transferred the mix to my Cuisinart, and blended the mix into a paste.  Then I thinned it with the corn stock that had been simmering on the stove.  Once we reached a good consistency, if a little thick, I transferred the puree int my chinoise and pressed the wonderful corn juice through its mesh.  Finally I was left with just the remaining corn meal, which I would later form into patties with a little extra parsley and sear on the stove top for corn cakes.  I placed the soup itself over the heat of the stove again, and simmered until any remaining beer alcohol had simmered out.  

The soup itself screamed summer to me. Sweet corn, deep flavored beer, lots of salt, butter and pepper...Every spoonful (despite the slightly unappetizing color) was like corn on the cob in liquid format.

Oh corn- you were always meant for beer weren't you? 

Share it

LinkWithin

Related Posts Plugin for WordPress, Blogger...

Groupon

Chobani Love